Google Webmaster Tools Account Setup
If you already have a Google account - even Gmail - then you're well on your way to submitting your sitemap because Google allows you to access and use any of their tools (Analytics, Calendar, etc.) from an existing account. If you don't already have an account, you can create one here along with a Gmail account, or if you'd like to skip Gmail and use your own existing email address as your user name, sign up here. In any case, once you have an account, simply visit this Webmaster Tools page to get started.Add Your Website to Webmaster Tools
Once you have a Google account and visit the WMT main page, linked to above, you'll see that you can start the process of submitting your site right away: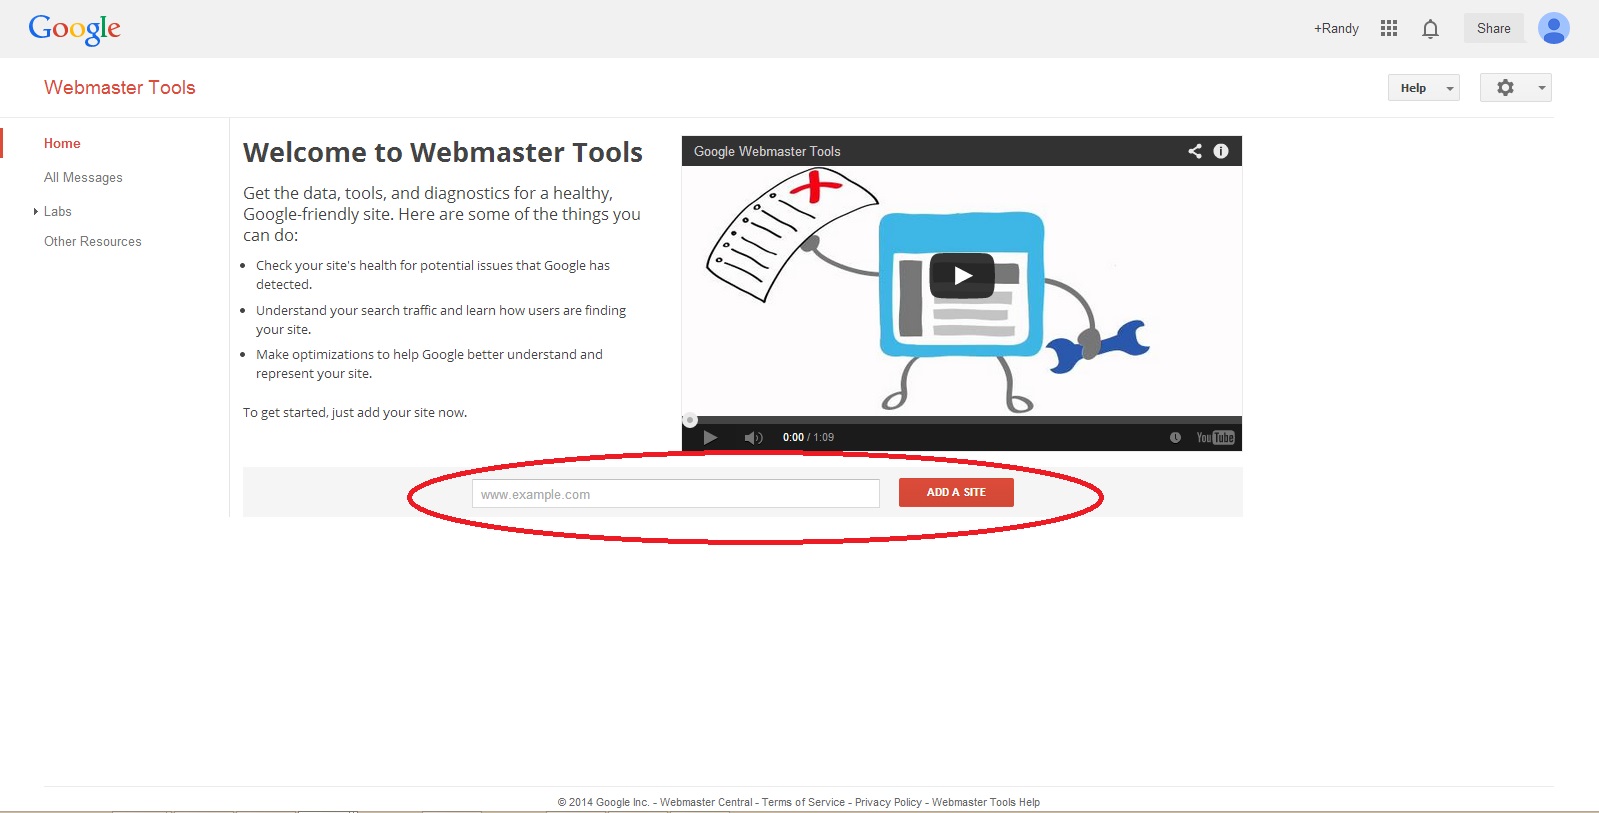 Keep in mind that at this point you're simply telling Google which site you intend to claim, but you'll still need to verify ownership, as you'll see immediately after you paste in your URL and hit the "Add a site" button. Site owner verification is obviously a wise security feature to prevent competitors and others with malicious intent from claiming your site:
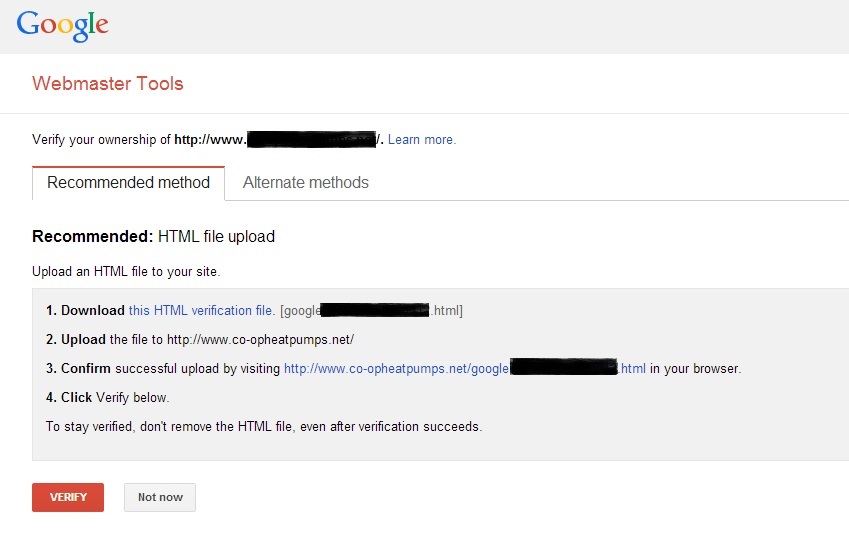 The verification process defaults to the recommended method of verifying by uploading an HTML file to your server to prove ownership, but as you can see in the screenshot above, there is a tab for "Alternate methods" of verification. HTML file upload is recommended because it's one of the simplest ways to prove ownership, but it requires FTP access, which not everyone has. That's where the other methods come in.
I expanded each of the 4 alternatives to take screenshots, which we'll explore a bit below so you can decide which verification route will work best for you:
The verification process defaults to the recommended method of verifying by uploading an HTML file to your server to prove ownership, but as you can see in the screenshot above, there is a tab for "Alternate methods" of verification. HTML file upload is recommended because it's one of the simplest ways to prove ownership, but it requires FTP access, which not everyone has. That's where the other methods come in.
I expanded each of the 4 alternatives to take screenshots, which we'll explore a bit below so you can decide which verification route will work best for you:
Webmaster Tools HTML Tag Verification
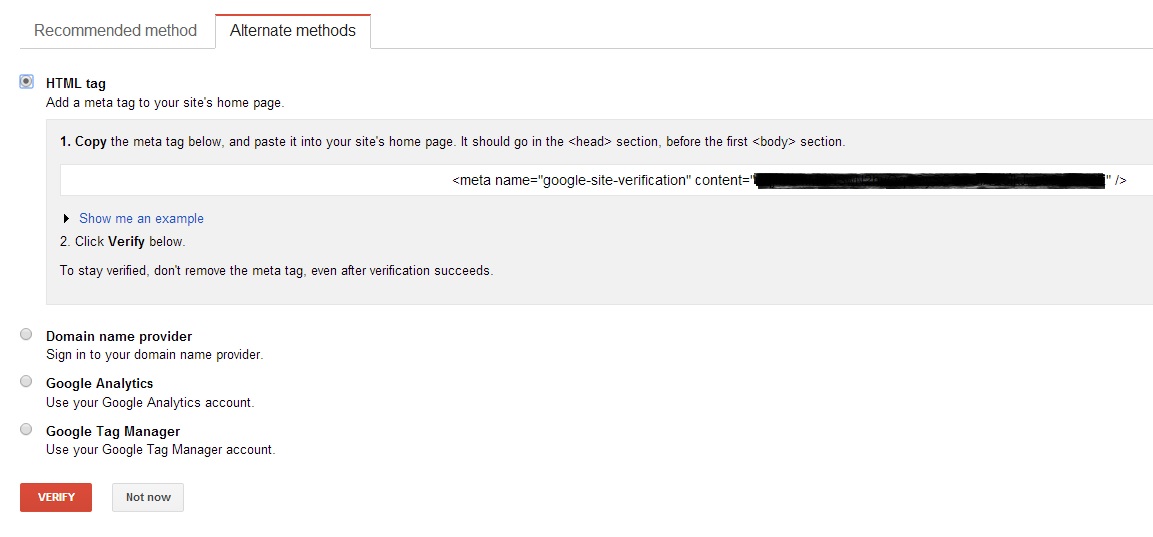 Verifying site ownership with a simple HTML tag that you put within your site's home page <head> tag is basically as easy as verifying by uploading an HTML file, but will again likely require FTP access and will also require you to get into the raw code of your site, which for many isn't a great idea. It's a simple change that practically anyone can make, but if you're not comfortable, you're best not to try. Better safe than sorry.
Webmaster Tools Domain Name Provider Verification
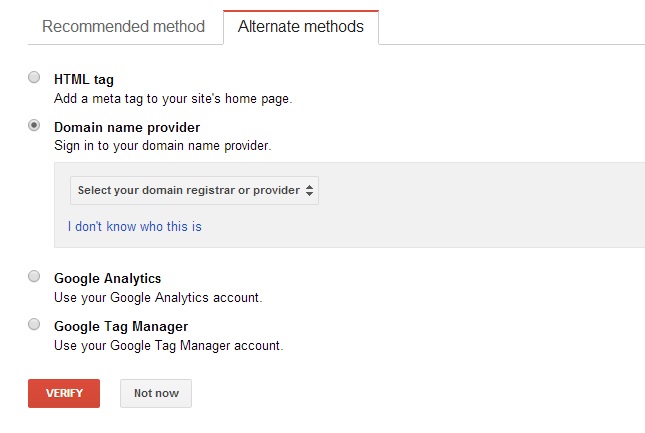 I've only given you a single screenshot here, but there are literally dozens, because the instructions are dynamic and will depend on which one of the dozens of domain name providers you select from the drop down. The instructions can vary greatly from one to the next, but they have a lot to do with adding CNAME records and editing DNS configurations.
Even though the individual instructions are thorough, as one of the non-technical staff here at VDW - but one who knows just enough to get into trouble - I'd recommend avoiding this method if you can, if you're not at least a little web-tech savvy. It's not that you're doing any coding, but it can just be a little intimidating.
I've only given you a single screenshot here, but there are literally dozens, because the instructions are dynamic and will depend on which one of the dozens of domain name providers you select from the drop down. The instructions can vary greatly from one to the next, but they have a lot to do with adding CNAME records and editing DNS configurations.
Even though the individual instructions are thorough, as one of the non-technical staff here at VDW - but one who knows just enough to get into trouble - I'd recommend avoiding this method if you can, if you're not at least a little web-tech savvy. It's not that you're doing any coding, but it can just be a little intimidating.
Webmaster Tools Google Analytics Verification
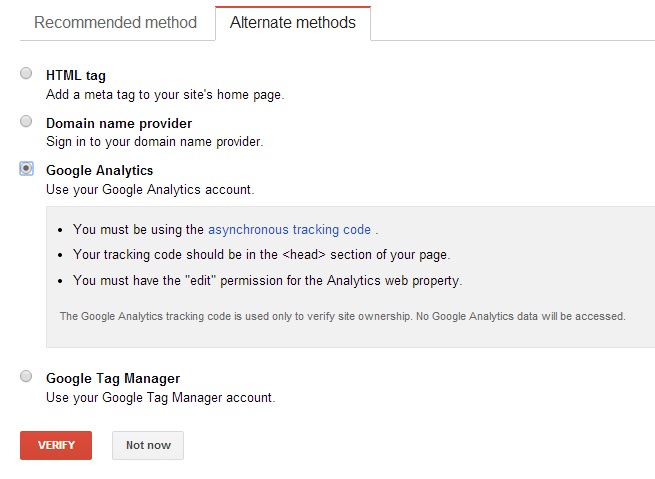
If you don't already Google Analytics tracking installed on your site, then your problems are bigger than any we're going to solve here today... So let's assume, for the purposes of this post, that you do have GA already.
The requirements for verification through Google Analytics are quite simple and clearly outlined in the screenshot above, but basically they are as follows- You need to use the asynchronous GA code on your site. The good news is, if you've upgraded to Universal Analytics tracking code, you already are. There was also async code available prior to Universal GA, so there's a good chance you have it even if you haven't upgraded. Let's again make a dangerous assumption, for the purposes of this post, that you have asynchronous GA code of some kind.
- You need full "edit" access to your Google Analytics account.
Webmaster Tools Google Tag Manager Verification
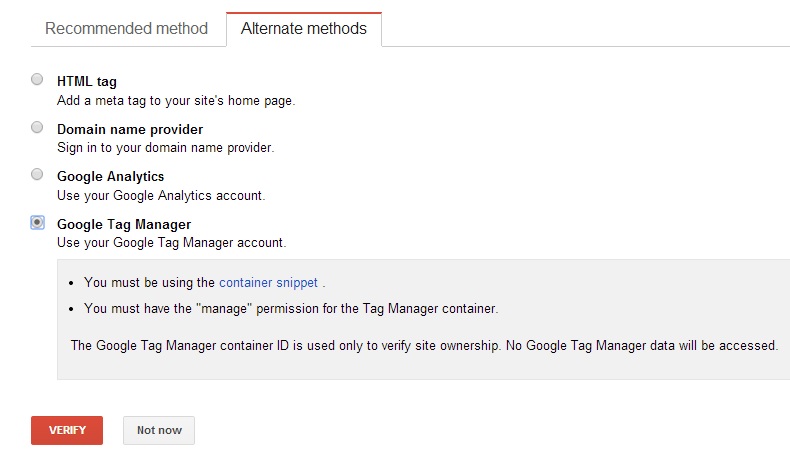 Verifying WMT site ownership with Google Tag Manager is similar to verifying through GA in the sense that, assuming some code was added to your site at some point in the past, you won't need any coding or technical expertise to complete verification. A brief explanation of Tag Manager would probably be helpful here:
What is Google Tag Manager?
Basically Tag Manager is a free Google service that allows non-technical people to add simple blocks of code to a "container" (Google Analytics code, for example), which auto-populates to all pages that have the "container snippet" code in place. Adding the "container snippet" is a one time process that requires a developer, but once it's in place, non-technical people (marketers, etc.) can easily modify/add code without needing to get their error-prone fingers on the raw code that actually powers the site. Or, as Google puts it:Google Tag Manager is quick, intuitive, and designed to let marketers add or change tags whenever they want, while also giving their IT and webmaster colleagues confidence that the site is running smoothly—and loading quickly—so that your users are never left hanging.As you can see in the screenshot, the requirements for this verification method are pretty limited:
- You must be using the container snippet .
- You must have the "manage" permission for the Tag Manager container.
 Now you're ready to submit your sitemap and help Google crawl (and hopefully index) your website.
Google Webmaster Tools Sitemap Submission
At this point I'm assuming your website has an XML sitemap that gets automatically updated as new pages/content is added. If not, then I strongly recommend you use this free XML sitemap generator tool, and then come back. It's pretty straightforward and will only take you a minute. Once you have a sitemap and it's uploaded to your root directory, you can proceed. To submit a sitemap, navigate to the "Crawl" section in the menu to the left and then choose "Sitemaps". You'll then see a red "ADD/TEST SITEMAP" button in the upper-right.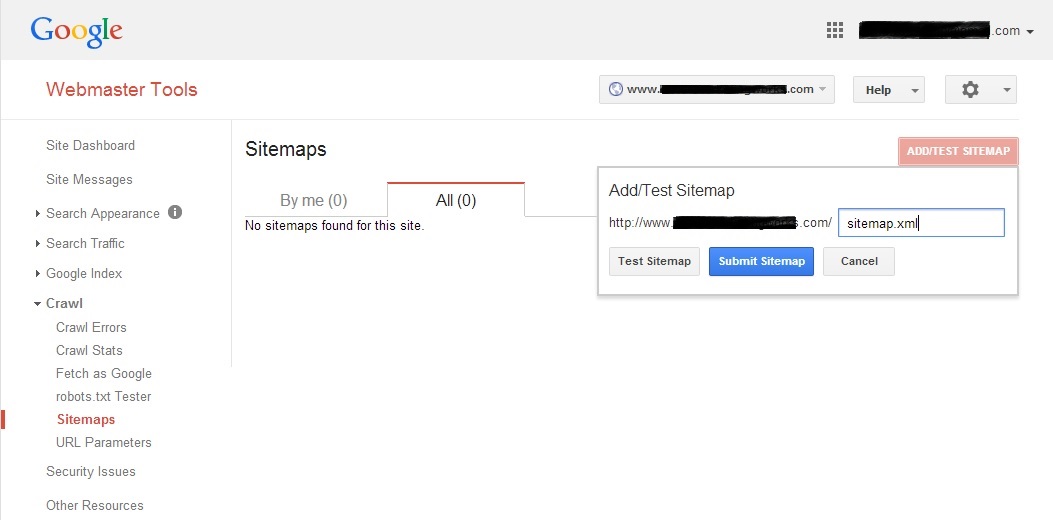 Enter the URL of your sitemap, and you're done!
 While Google doesn't guarantee indexing, your site will be indexed - in all likelihood - if you've set your sitemap up correctly, your website utilizes even remotely current programming, and you aren't involved in any shady link buying schemes, etc.
We'll delve into some of the other benefits of Webmaster Tools in future posts, such as crawl errors and monitoring search queries that drive traffic, but verifying ownership and submitting your sitemap are the first steps to take.
While Google doesn't guarantee indexing, your site will be indexed - in all likelihood - if you've set your sitemap up correctly, your website utilizes even remotely current programming, and you aren't involved in any shady link buying schemes, etc.
We'll delve into some of the other benefits of Webmaster Tools in future posts, such as crawl errors and monitoring search queries that drive traffic, but verifying ownership and submitting your sitemap are the first steps to take.